Community
The Anypoint™ Connector for Amazon S3 provides an easy way to interface with the Amazon Simple Storage Service API, allowing users to store data in the cloud without having to deal with the API directly.
Introduction
Amazon Simple Storage Service (Amazon S3) is storage for the Internet. You can use Amazon S3 to store and retrieve any amount of data at any time, from anywhere on the web. You can accomplish these tasks using the simple and intuitive web interface of the AWS Management Console.
The AWS SDK for Java provides a Java API for AWS infrastructure services. The Amazon S3 connector is built using the SDK for Java. For the complete list of operations supported by the connector, see Apidocs and Samples.
Prerequisites
This document assumes you are familiar with Mule, Anypoint Connectors, and Anypoint Studio Essentials. To increase your familiarity with Studio, consider completing one or more Anypoint Studio Tutorials. Further, this page assumes that you have a basic understanding of Mule flows and Mule Global Elements.
This document describes implementation examples within the context of Anypoint Studio, Mule ESB’s graphical user interface, and, in parallel, includes configuration details for doing the same in the XML Editor.
Dependencies
As the connector comes pre-bundled with Anypoint Studio, you must:
-
Install Anypoint Studio.
-
Sign Up for Amazon Web Services. To access AWS with the connector, you need the credentials in the form of IAM.
Compatibility Matrix
| Application/Service | Version |
|---|---|
Mule Runtime |
3.5.0 and above |
AWS SDK for Java |
1.9.39 |
Installing and Configuring
Installing
You can install a connector in Anypoint Studio using the instructions in Installing a Connector from Anypoint Exchange.
Updating From an Older Version
Everytime an updated version of a connector is released, Anypoint studio displays a popup in the bottom right corner of you screen with the following message: Updates Available. To upgrade to the newer version of the Amazon S3 connector:
-
Click the popup and check for the available updates.
-
Select the Amazon S3 connector version 3.0.0 check-box and click Next.
-
Follow the instructions provided by the user interface.
-
Restart Studio when prompted. After restarting, if you have several versions of the connector installed, Mule asks you for the version of the connector you like to use.
|
With Amazon S3 connector v3.0.0, the following operations have been updated as below:
|
Creating a New Project
To use the Amazon S3 connector in a Mule application project:
-
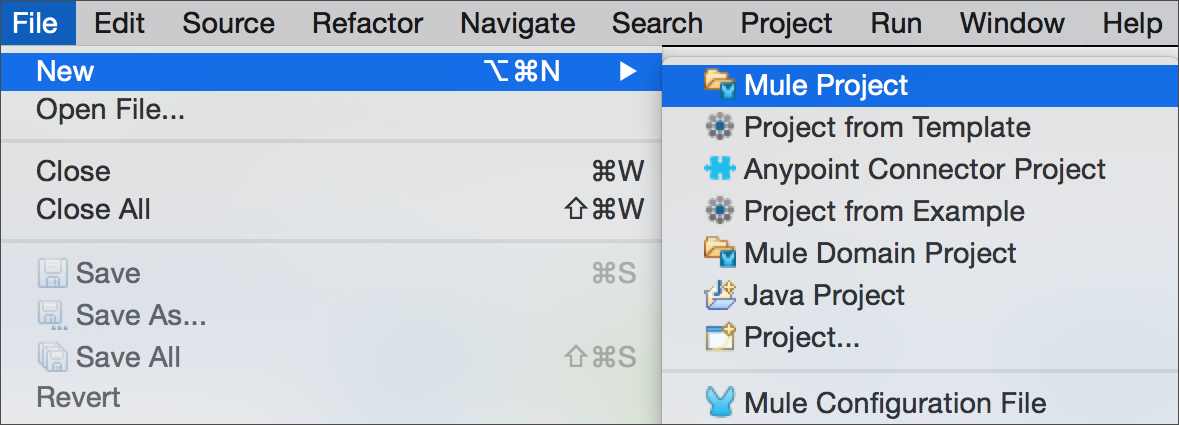
In Studio, select File>New>Mule Project.
-
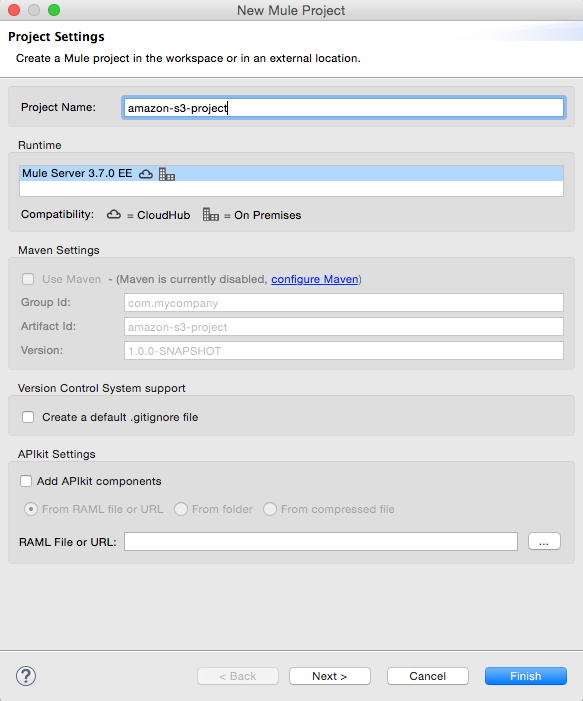
Enter a name for your new project and leave the remaining options with their default values.
-
If you plan to use Git, select Create a .gitignore file for the project with default ignores for Studio Projects, and then click Next.
-
Click Finish to create the project.
Configuring the Amazon S3 Connector Global Element
To use the Amazon S3 connector in your Mule application, you must configure a global element that can be used by all the Amazon S3 connectors in the application (read more about global elements).
To create a global Amazon S3 connector configuration:
-
Click the Global Elements tab at the base of the canvas.
-
On the Global Mule Configuration Elements screen, click Create.
-
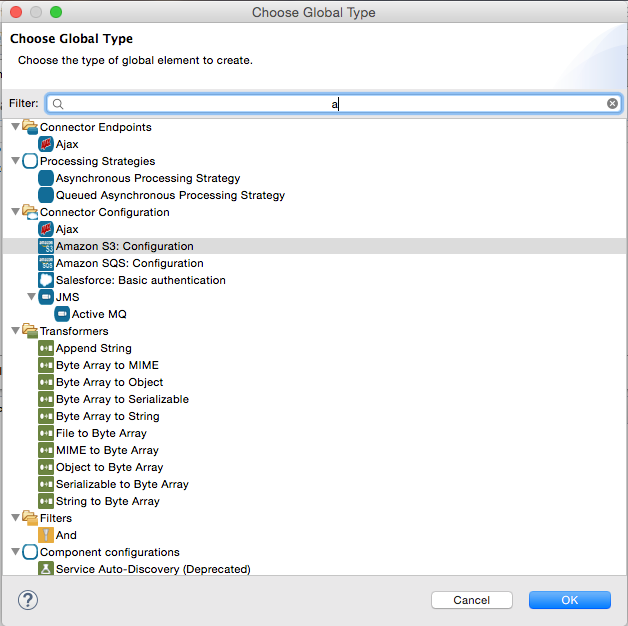
In the Choose Global Type wizard, expand Connector Configuration, and then select Amazon S3: Configuration.
-
Click OK.
-
Enter the global element properties:
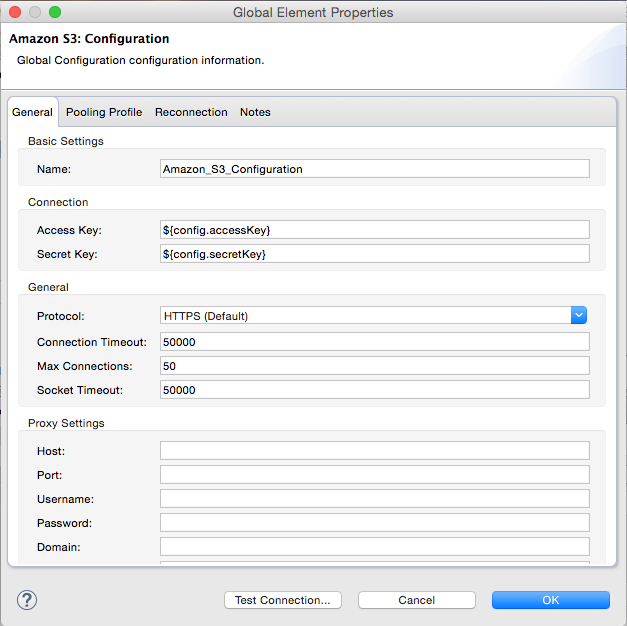
Key Parameters Description Example Access Key
Alphanumeric text string that uniquely identifies the user who owns the account
AKIAIA6DCDAES37G62OA
Secret Key
Key that plays the role of a password
MMXcMDzAZ8M2234dogcwuXvWy0+cYuetl-4wAKFJB
-
Keep the Pooling Profile and the Reconnection tabs with their default entries.
-
Click Test Connection to confirm that the parameters of your global configuration are accurate, and that Mule is able to successfully connect to your instance of Amazon S3. Read more about Testing Connections.
-
Click OK to save the global connector configurations.
Using the Connector
The Amazon S3 connector is an operation-based connector, which means that when you add the connector to your flow, you need to configure a specific operation the connector is intended to perform. The Amazon S3 connector supports the following operations:
|
For the all the below operations in the connector to work, you need to enable/update the subset of the overall list of Amazon S3 actions on the bucket to specify that the AWS account has access to the subset actions on the bucket. |
-
Abort Multipart Upload
-
Complete Multipart Upload
-
Copy Object
-
Create Bucket
-
Create Object
-
Create Object Presigned URI
-
Delete Bucket
-
Delete Bucket Cross Origin Configuration
-
Delete Bucket Lifecycle Configuration
-
Delete Bucket Policy
-
Delete Bucket Tagging Configuration
-
Delete Bucket Website Configuration
-
Delete Object
-
Delete Objects
-
Get Bucket ACL
-
Get Bucket Cross Origin Configuration
-
Get Bucket Lifecycle Configuration
-
Get Bucket Location
-
Get Bucket Logging Configuration
-
Get Bucket Notification Configuration
-
Get Bucket Policy
-
Get Bucket Tagging Configuration
-
Get Bucket Versioning Configuration
-
Get Bucket Website Configuration
-
Get Object
-
Get Object ACL
-
Get Object Content
-
Get Object Metadata
-
Initiate Multipart Upload
-
List Buckets
-
List Multipart Uploads
-
List Next Batch of Objects
-
List Next Batch of Versions
-
List Objects
-
List Parts
-
List Versions
-
Set Bucket ACL
-
Set Bucket Cross Origin Configuration
-
Set Bucket Lifecycle Configuration
-
Set Bucket Logging Configuration
-
Set Bucket Notification Configuration
-
Set Bucket Policy
-
Set Bucket tagging Configuration
-
Set Bucket Versioning Configuration
-
Set Bucket Website Configuration
-
Set Object ACL
-
Set Object Storage Class
-
Upload Part
-
Upload Part Copy
Adding the Amazon S3 Connector to a Flow
-
Create a new Mule project in Anypoint Studio.
-
Drag the Amazon S3 connector onto the canvas, then select it to open the properties editor.
-
Configure the connector’s parameters:

Field Description Example Display Name
Enter a unique label for the connector in your application
Create Bucket
Connector Configuration
Select a global Amazon S3 connector element from the drop-drown.
Amazon_S3_Configuration
Operation
Select an operation for the connector perform.
Create bucket
Bucket Name
Select a parameter for the operation.
#[payload] or ${bucketName} to pick the value using MEL expression.
-
Click the blank space on the canvas to save your connector configurations.
Example Use Case
Lets build a simple application with Mule that stores an image from a URL on Amazon S3, then retrieves and displays the image.

Begin the flow by sending a message to bucket.
-
Create a new Mule project in Anypoint Studio.
-
Drag an HTTP connector into the canvas, then select it to open the properties editor console.
-
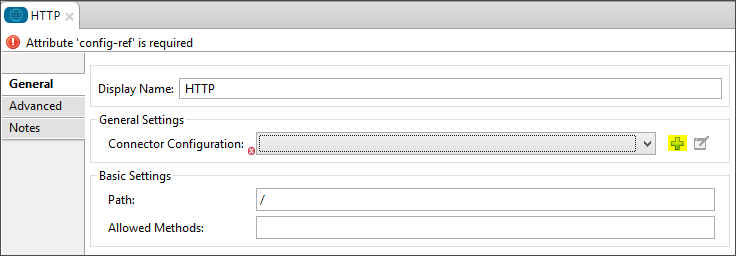
Add a new HTTP Listener Configuration global element:
-
In General Settings, click the + button:
-
Configure the following HTTP parameters, while retaining the default values for the other fields:
Field Value Name
HTTP_Listener_Configuration
Port
8081
-
Reference the HTTP Listener Configuration global element.
-
-
Drag an Amazon S3 connector into the flow, and double-click the connector to open its Properties Editor.
-
If you do not have an existing Amazon S3 connector global element to choose, click the plus sign next to Connector Configuration.
-
Configure the global element properties, then click OK.
-
Configure the remaining parameters of the connector:

Field Value Display Name
Enter a name for the connector instance.
Connector Configuration
Select the global configuration you created.
Operation
Create bucket
Bucket Name
${config.bucket}
Canned ACL
PUBLIC_READ
-
Add a HTTP Connector to request the MuleSoft logo from the mulesoft.org site.

Field Value Display Name
Enter a name for the connector instance.
Connector Configuration
Create a new default configuration with Host as mulesoft.org and Port as 80.
Path
Set the path as sites/all/themes/mulesoft_community/logo.png
Method
GET
-
Drag another Amazon S3 connector to create the above requested MuleSoft logo in the selected Amazon S3 Bucket.

Field Value Display Name
Enter a name of your choice.
Connector Configuration
Select the global configuration you created.
Operation
Create object
Bucket Name
${config.bucket}
Key
mulesoft.png
Content Reference
#[payload]
-
Now that we haved added the image object to the bucket, let try adding another Amazon S3 connector to get the newly created MuleSoft logo image object from the bucket:

Field Value Display Name
Enter a name for the connector instance.
Connector Configuration
Select the global configuration you create.
Operation
Get object content
Bucket Name
${config.bucket}
Key
mulesoft.png
-
Finally add another Amazon S3 connector to delete the bucket. Since delete bucket operation’s return type is void, the payload contains the object returned by the get image operation.

This completes the use case.
Example Code
| For this code to work in Anypoint Studio, you must provide Amazon Web Services credentials. You can either replace the variables with their values in the code, or you can provide the values for each variable in the src/main/app/mule-app.properties file. |
<?xml version="1.0" encoding="UTF-8"?>

<mule xmlns:s3="http://www.mulesoft.org/schema/mule/s3" xmlns:http="http://www.mulesoft.org/schema/mule/http" xmlns:tracking="http://www.mulesoft.org/schema/mule/ee/tracking" xmlns="http://www.mulesoft.org/schema/mule/core" xmlns:doc="http://www.mulesoft.org/schema/mule/documentation"
        xmlns:spring="http://www.springframework.org/schema/beans" version="EE-3.6.2"
        xmlns:xsi="http://www.w3.org/2001/XMLSchema-instance"
        xsi:schemaLocation="http://www.springframework.org/schema/beans http://www.springframework.org/schema/beans/spring-beans-current.xsd
http://www.mulesoft.org/schema/mule/core http://www.mulesoft.org/schema/mule/core/current/mule.xsd
http://www.mulesoft.org/schema/mule/http http://www.mulesoft.org/schema/mule/http/current/mule-http.xsd
http://www.mulesoft.org/schema/mule/ee/tracking http://www.mulesoft.org/schema/mule/ee/tracking/current/mule-tracking-ee.xsd
http://www.mulesoft.org/schema/mule/s3 http://www.mulesoft.org/schema/mule/s3/current/mule-s3.xsd">
    <http:listener-config name="HTTP_Listener_Configuration" host="0.0.0.0" port="8081" doc:name="HTTP Listener Configuration"/>
    <http:request-config name="HTTP_Request_Configuration" host="mulesoft.org" port="80" doc:name="HTTP Request Configuration"/>
    <s3:config name="Amazon_S3_Configuration" accessKey="${config.accessKey}" secretKey="${config.secretKey}" doc:name="Amazon S3: Configuration"/>
    <flow name="s3-example-flow">
        <http:listener config-ref="HTTP_Listener_Configuration" path="/" doc:name="HTTP"/>
        <s3:create-bucket config-ref="Amazon_S3_Configuration" bucketName="${config.bucket}" acl="PUBLIC_READ" doc:name="Create S3 Bucket"/>
        <http:request config-ref="HTTP_Request_Configuration" path="sites/all/themes/mulesoft_community/logo.png" method="GET" doc:name="Get MuleSoft logo"/>
        <s3:create-object config-ref="Amazon_S3_Configuration" doc:name="Create logo object in S3 bucket" acl="PUBLIC_READ" bucketName="${config.bucket}" key="mulesoft.png"/>
        <s3:get-object-content config-ref="Amazon_S3_Configuration" bucketName="${config.bucket}" key="mulesoft.png" doc:name="Get Image"/>
        <s3:delete-bucket config-ref="Amazon_S3_Configuration" bucketName="${config.bucket}" force="true" doc:name="Delete S3 Bucket"/>
    </flow>
</mule>
Test the flows
After the flows are ready and the Mule app is up, visit http://localhost:8081 to test the flow. The expected output would be MuleSoft | Community image as shown below.
See Also
-
Learn more about working with Anypoint Connectors.
-
Learn how to use Mule Transformers.
