The Anypoint™ Connector for Amazon SQS provides an easy way to interface with the Amazon Simple Queue Service API, allowing Mule ESB users to manage SQS queueing services without having to deal with the API directly.
Release Notes: Amazon SQS Connector Release Notes.
Introduction
Amazon Simple Queue Service (Amazon SQS) offers a reliable, highly scalable hosted queue for storing messages as they travel between computers. By using Amazon SQS, developers can simply move data between distributed application components performing different tasks, without losing messages or requiring each component to be always available. Amazon SQS makes it easy to build an automated workflow, working in close conjunction with the Amazon Elastic Compute Cloud (Amazon EC2) and the other AWS infrastructure web services.
The AWS SDK for Java provides a Java API for AWS infrastructure services. The Amazon SQS connector is built using the SDK for Java. For the complete list of operations supported by the connector, see Apidocs and Samples.
Although it is called a queue, Amazon SQS does not guarantee FIFO access to messages in Amazon SQS queues, mainly because of its distributed nature. If you require specific message ordering, you need to design your application to handle it.
Prerequisites
This document assumes you are familiar with Mule, Anypoint Connectors, and Anypoint Studio Essentials. To increase your familiarity with Studio, consider completing one or more Anypoint Studio Tutorials. Further, this page assumes that you have a basic understanding of Mule flows and Mule Global Elements.
This document describes implementation examples within the context of Anypoint Studio, Mule ESB’s graphical user interface, and, in parallel, includes configuration details for doing the same in the XML Editor.
As the connector comes pre-bundled with Anypoint Studio, you must:
-
Install Anypoint Studio.
-
Sign Up for Amazon Web Services. To access AWS with the connector, you need the credentials in the form of IAM.
Compatibility
Amazon SQS connector 3.0 is compatible with:
| Application/Service | Version |
|---|---|
Mule Runtime |
3.5.x or later |
AWS SDK for Java |
1.9.39 |
|
The package names of the arguments and the return types of most of the operations have been updated in this version of the connector. Refer to the updated package names depending on how you are using the connector. For example, the Message Attributes input argument in the Send Message operation now expects a |
|
For all the operations in the connector to work, you need to update the subset of the overall list of Amazon SQS actions in the current SQS Policy with the new actions to specify which AWS account has access to the actions on a queue. Please ensure that |
Installing and Configuring
The following sections describe how to install and configure the Amazon SQS connector.
Installing
You can install a connector in Anypoint Studio using the instructions in Installing a Connector from Anypoint Exchange.
Updating from an Older Version
When a new version of a connector is released, Anypoint studio displays a popup in the bottom right corner of you screen with the following message: Updates Available. To upgrade to the newer version of the Amazon SQS connector:
-
Click the popup and check for the available updates.
-
Select the Amazon SQS connector 3.0 check-box and click Next.
-
Follow the instructions provided by the user interface.
-
Restart Studio when prompted.
-
After restarting, if you have several versions of the connector installed, Mule asks you for the version of the connector you like to use.
Creating a New Project
-
In Studio, click File > New > Mule Project.
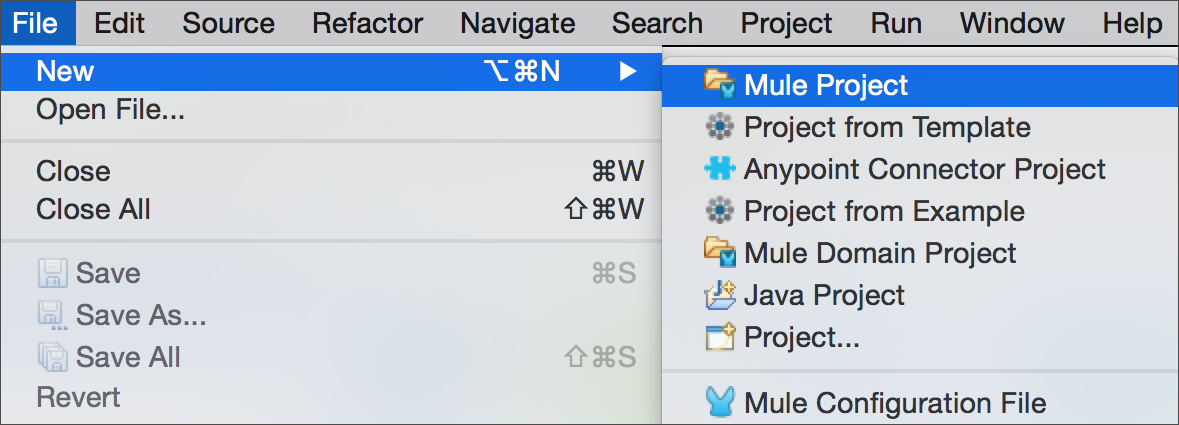
-
Enter a name for your new project and leave the remaining options with their default values.
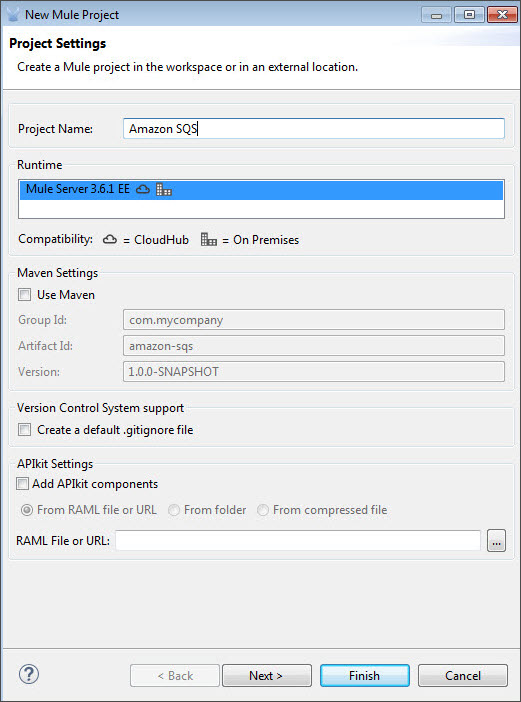
-
If you plan to use Git, select Create a .gitignore file for the project with default ignores for Studio Projects, and then click Next.
-
Click Finish to create the project.
Configuring the Amazon SQS Connector Global Element
To use the Amazon SQS connector in your Mule application, you must configure a global element that can be used by all the Amazon SQS connectors in the application (read more about global elements).
To create a global Amazon SQS connector configuration:
-
Click the Global Elements tab at the base of the canvas.
-
On the Global Mule Configuration Elements screen, click Create.
-
In the Choose Global Type wizard, expand Connector Configuration, and then select Amazon SQS: Configuration.
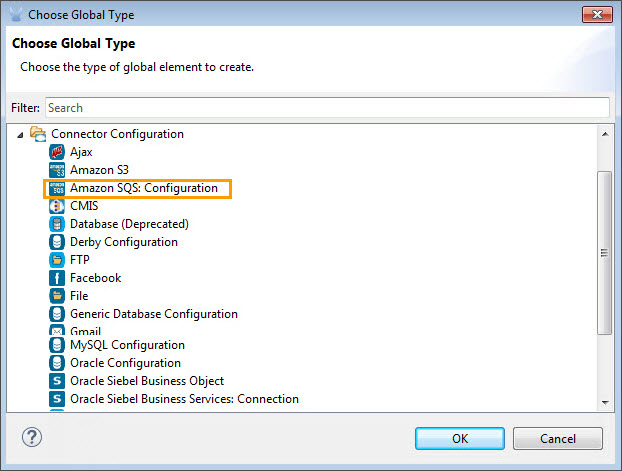
-
Click OK.
-
Enter the global element properties:
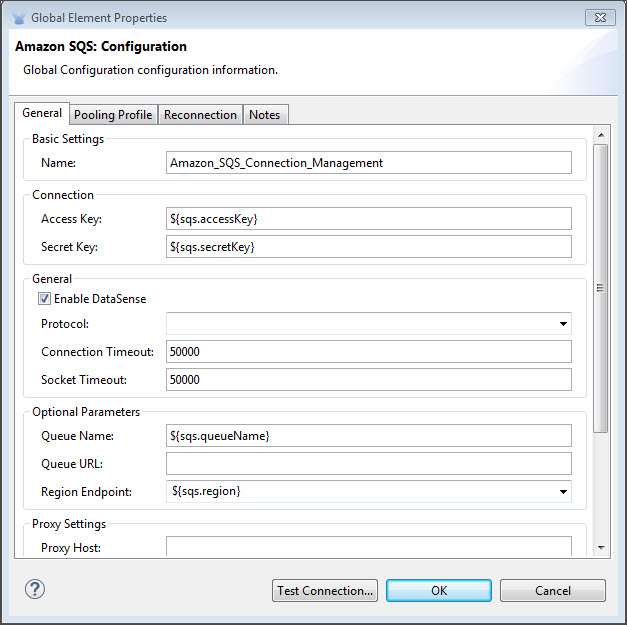
Field Description Access Key
Alphanumeric text string that uniquely identifies the user who owns the account.
Secret Key
Key that plays the role of a password.
Queue Name
The default queue name; if it doesn’t exist, Mule automatically creates the queue.
Queue URL
The URL of the Amazon SQS queue to act upon.
Region Endpoint
The regional endpoint to process your requests.
When a Queue Name is provided in the global element, the connector automatically creates the queue and sets the URL of this queue as Queue URL. All the Amazon SQS Message processors that reference the global element perform operations using this Queue URL.
If you have to reference a different Queue URL for a particular message processor in the flow, you can perform the operation using the Queue URL attribute provided by the message processor.
-
Keep the Pooling Profile and the Reconnection tabs with their default entries.
-
Click Test Connection to confirm that the parameters of your global configuration are accurate, and that Mule is able to successfully connect to your instance of Amazon SQS. Read more about Testing Connections.
-
Click OK to save the global connector configurations.
Using the Connector
The Amazon SQS connector is an operation-based connector, which means that when you add the connector to your flow, you need to configure a specific operation the connector is intended to perform. The Amazon SQS connector supports the following operations:
-
Add Permission
-
Change message visibility
-
Change message visibility batch
-
Create queue
-
Delete message
-
Delete message batch
-
Delete queue
-
Get approximate number of messages
-
Get queue attributes
-
Get queue URL
-
List dead letter source queues
-
List queues
-
Purge Queue
-
Receive Messages
-
Remove permission
-
Send message batch
-
Send message
-
Set Queue Attributes
Adding the Amazon SQS Connector to a Flow
-
Create a new Mule project in Anypoint Studio.
-
Drag the Amazon SQS connector onto the canvas, then select it to open the properties editor.
-
Configure the connector’s parameters:
Field Value Display Name
Enter a unique label for the connector in your application.
Connector Configuration
Select a global Amazon SQS connector element from the drop-drown.
Operation
Select an operation for the connector perform.
Queue URL
Select a parameter for the operation.
-
Click the blank space on the canvas to save your connector configurations.
Example Use Case
Send a message along with meta data to an Amazon SQS queue and then receive it from the queue. This can be split into the following two flows:
-
Send message along with metadata, and then get the count of the messages in the queue to validate that the message has been sent.
-
Receive the message, log the message body, and delete the message from the queue.
Studio Visual Editor

Create a Flow to Send a Message
Begin the flow by sending a message to the queue:
-
Create a new Mule project in Anypoint Studio.
-
Drag an HTTP Connector into the canvas, then select it to open the properties editor console.
-
Add a new HTTP Listener Configuration global element:
-
In General Settings, click the + button:
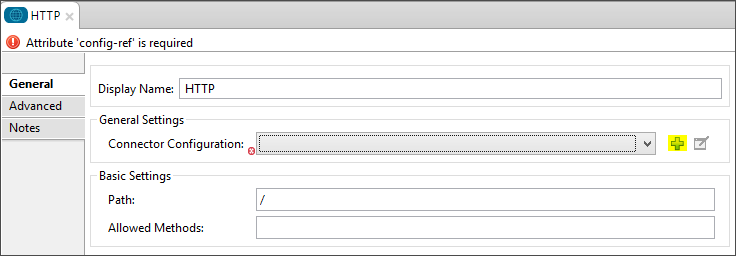
-
Configure the following HTTP parameters, while retaining the default values for the other fields:
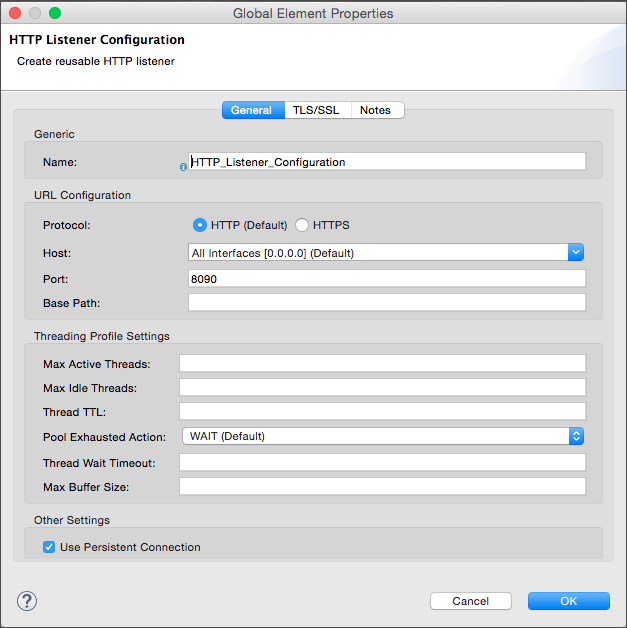
Field Value Name
HTTP Listener Configuration
Port
8081
-
Add a Transform Message component to attach the metadata:
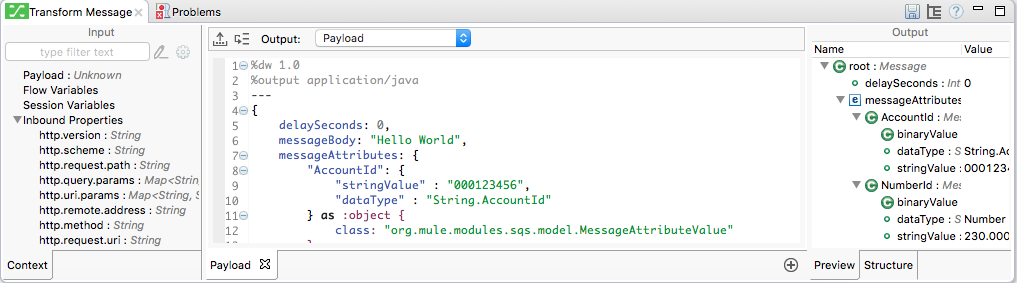
1 2 3 4 5 6 7 8 9 10 11 12 13 14 15 16 17 18 19 20 21 22 23 24 25
%dw 1.0 %output application/java --- { delaySeconds: 0, messageBody: "Hello World", messageAttributes: { "AccountId": { "stringValue" : "000123456", "dataType" : "String.AccountId" } as :object { class: "org.mule.modules.sqs.model.MessageAttributeValue" }, "NumberId": { "stringValue" : "230.000000000000000001", "dataType" : "Number" } as :object { class : "org.mule.modules.sqs.model.MessageAttributeValue" } } as :object { class: "java.util.HashMap" } } as :object { class: "org.mule.modules.sqs.model.Message" } -
Drag an Amazon SQS connector into the flow, and double-click the connector to open its Properties Editor.
-
If you do not have an existing Amazon SQS connector global element to choose, click the plus sign next to Connector Configuration.
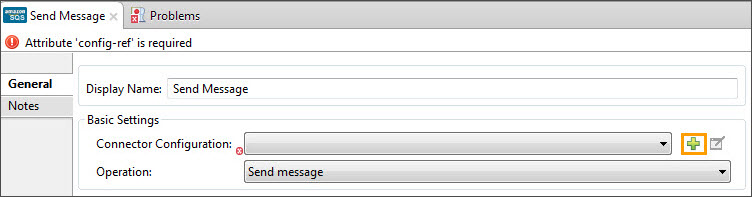
-
Configure the global element properties, then click OK.
-
Configure the remaining parameters of the connector:
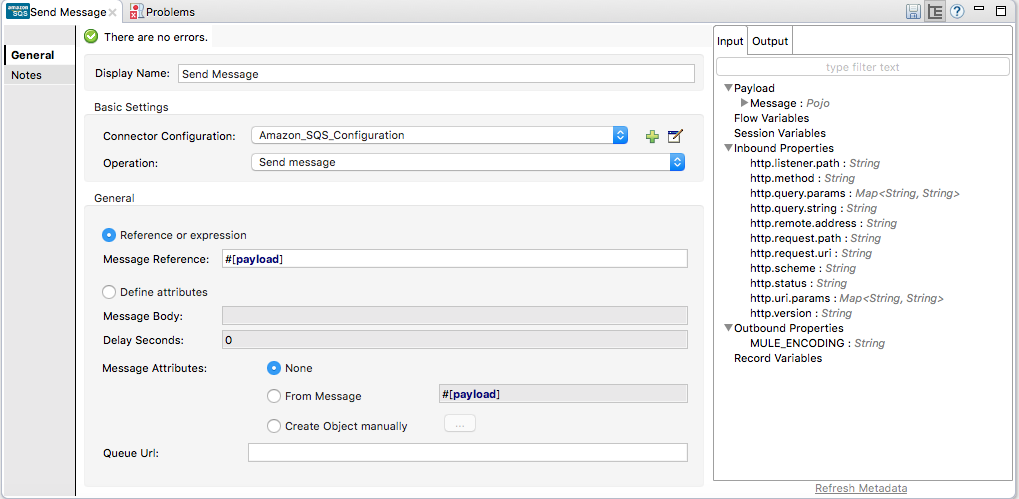
Field Value Display Name
Enter a name for the connector instance.
Connector Configuration
Select the global configuration you create.
Operation
Send Message
Message
#[payload] -
Add an Object To JSON transformer to convert the response from connector into JSON.
-
Add a Logger to print the response in the Mule Console.
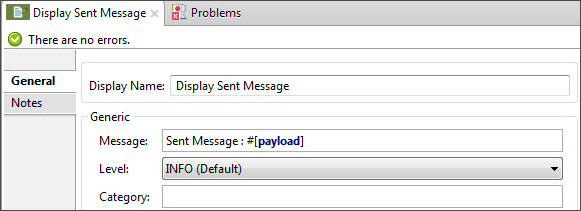
Field Value Display Name
Enter a name for the logger.
Message
Sent Message:
#[payload]Level
INFO (Default)
-
Add another Amazon SQS connector to get the count of the messages in the queue.
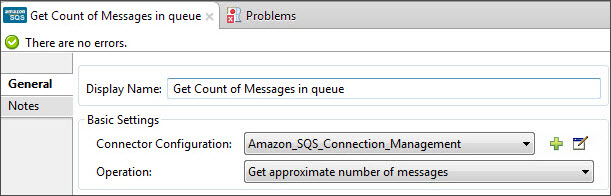
Field Value Display Name
Enter a name for the connector instance.
Connector Configuration
Select the global configuration you create.
Operation
Get approximate number of messages.
-
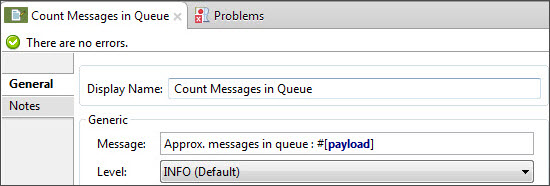
Add a Logger to print the number in the Mule Console.
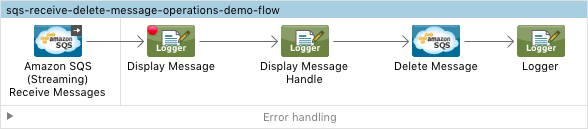
Create a Flow to Receive a Message
This completes the first part of the use case. Now create another flow to receive message and long them before deleting them from the queue.
-
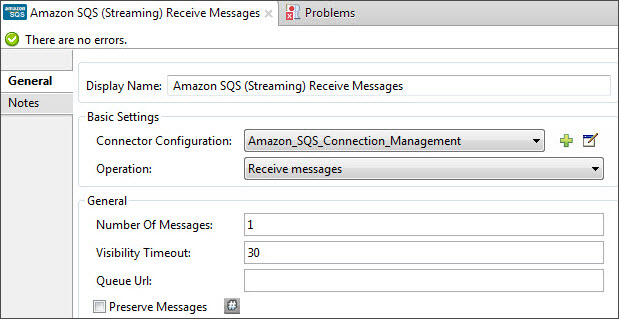
Drag an Amazon SQS connector and configure it as an inbound endpoint:
Field Value Display Name
Enter a name for the connector instance.
Connector Configuration
Select the global configuration you create.
Operation
Receive Messages
Number of Messages
1
Visibility Timeout
30
The Message processor’s Queue URL attribute takes precedence over the Global Element Properties Queue URL. If none of the attributes belonging to Global Element Properties, including Queue Name, Queue URL, and the Message Processor’s Queue URL is provided, the connector throws an exception.
-
Add a Logger to print the message in the Mule Console:
Field Value Display Name
Enter a name of your choice.
Message
Received Message: #[payload]
Level
INFO (Default)
-
Add another Logger to print the message handle in the console.
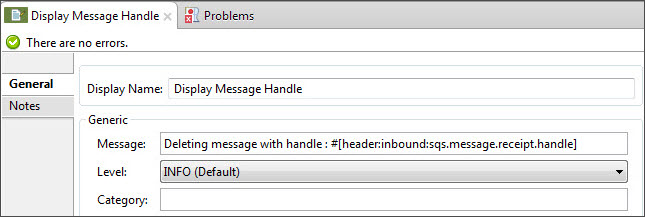
Field Value Display Name
Enter a name of your choice.
Message
Deleting message with handle:
#[header:inbound:sqs.message.receipt.handle]Level
INFO (Default)
-
Now configure an Amazon SQS connector to delete the message from the queue.
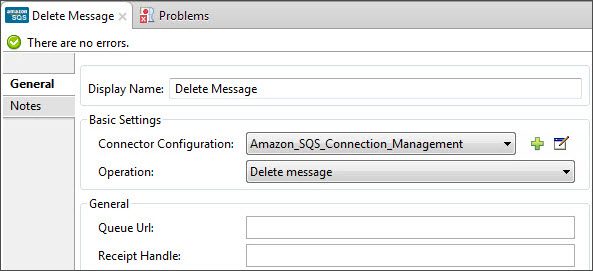
Field Value Display Name
Enter a name for the connector instance.
Connector Configuration
Select the global configuration you create.
Operation
Delete Message
-
Add a Logger to print the status in the mule console after the message is deleted.
Studio XML Editor
|
For this code to work in Anypoint Studio, you must provide Amazon Web Services credentials. You can either replace the variables with their values in the code, or you can provide the values for each variable in the |
<?xml version="1.0" encoding="UTF-8"?>

<mule xmlns:dw="http://www.mulesoft.org/schema/mule/ee/dw" xmlns:json="http://www.mulesoft.org/schema/mule/json" xmlns:http="http://www.mulesoft.org/schema/mule/http"
        xmlns:sqs="http://www.mulesoft.org/schema/mule/sqs" xmlns:tracking="http://www.mulesoft.org/schema/mule/ee/tracking"
        xmlns="http://www.mulesoft.org/schema/mule/core" xmlns:doc="http://www.mulesoft.org/schema/mule/documentation"
        xmlns:spring="http://www.springframework.org/schema/beans" version="EE-3.7.1"
        xmlns:xsi="http://www.w3.org/2001/XMLSchema-instance"
        xsi:schemaLocation="http://www.springframework.org/schema/beans http://www.springframework.org/schema/beans/spring-beans-current.xsd
http://www.mulesoft.org/schema/mule/core http://www.mulesoft.org/schema/mule/core/current/mule.xsd
http://www.mulesoft.org/schema/mule/http http://www.mulesoft.org/schema/mule/http/current/mule-http.xsd
http://www.mulesoft.org/schema/mule/sqs http://www.mulesoft.org/schema/mule/sqs/current/mule-sqs.xsd
http://www.mulesoft.org/schema/mule/ee/tracking http://www.mulesoft.org/schema/mule/ee/tracking/current/mule-tracking-ee.xsd
http://www.mulesoft.org/schema/mule/json http://www.mulesoft.org/schema/mule/json/current/mule-json.xsd
http://www.mulesoft.org/schema/mule/ee/dw http://www.mulesoft.org/schema/mule/ee/dw/current/dw.xsd">
        <http:listener-config name="HTTP_Listener_Configuration"
                host="0.0.0.0" port="8081" doc:name="HTTP Listener Configuration" />
    <sqs:config name="Amazon_SQS_Configuration" accessKey="${sqs.accessKey}" secretKey="${sqs.secretKey}" defaultQueueName="${sqs.queueName}" region="${sqs.region}" doc:name="Amazon SQS: Configuration"/>
        <flow name="sqs-send-message-operation-demo-flow">
                <http:listener config-ref="HTTP_Listener_Configuration"
                        path="/sendmessage" doc:name="HTTP" />
        <dw:transform-message doc:name="Transform Message">
            <dw:set-payload><![CDATA[%dw 1.0
%output application/java
---
{
        delaySeconds: 0,
        messageBody: "Hello World",
        messageAttributes: {
                "AccountId": {
                        "stringValue" : "000123456",
                        "dataType" : "String.AccountId"
                } as :object {
                        class: "org.mule.modules.sqs.model.MessageAttributeValue"
                },
                "NumberId": {
                        "stringValue" : "230.000000000000000001",
                        "dataType" : "Number"
                } as :object {
                        class : "org.mule.modules.sqs.model.MessageAttributeValue"
                }
        } as :object {
                class: "java.util.HashMap"
        }
} as :object {
        class: "org.mule.modules.sqs.model.Message"
}]]></dw:set-payload>
        </dw:transform-message>
        <sqs:send-message config-ref="Amazon_SQS_Configuration" doc:name="Send Message">
            <sqs:message ref="#[payload]"/>
        </sqs:send-message>
        <json:object-to-json-transformer doc:name="Object to JSON"/>
        <logger message="Sent Message : #[payload]" level="INFO" doc:name="Display Sent Message"/>
                <sqs:get-approximate-number-of-messages
                        config-ref="Amazon_SQS_Configuration" doc:name="Get Count of Messages in queue" />
        <logger message="Approx. messages in queue : #[payload]" level="INFO" doc:name="Count Messages in Queue"/>
                <set-payload value="Operations successful, Please check the mule console for message received ."
                        doc:name="Display Message Count" />
        </flow>
        <flow name="sqs-receive-delete-message-operations-demo-flow">
        <sqs:receive-messages config-ref="Amazon_SQS_Configuration" doc:name="Amazon SQS (Streaming) Receive Messages"/>
                <logger message="Received Message : #[payload]" level="INFO"
                        doc:name="Display Message" />
        <logger message="Deleting message with handle : #[header:inbound:sqs.message.receipt.handle]" level="INFO" doc:name="Display Message Handle"/>
        <sqs:delete-message config-ref="Amazon_SQS_Configuration" doc:name="Delete Message"/>
        <logger message="Message deleted sucessfully from queue." level="INFO" doc:name="Logger"/>
        </flow>
</mule>
Demo
You can download a fully working example from here
See Also
-
Learn more about working with Anypoint Connectors.
-
Learn how to use Mule Transformers.